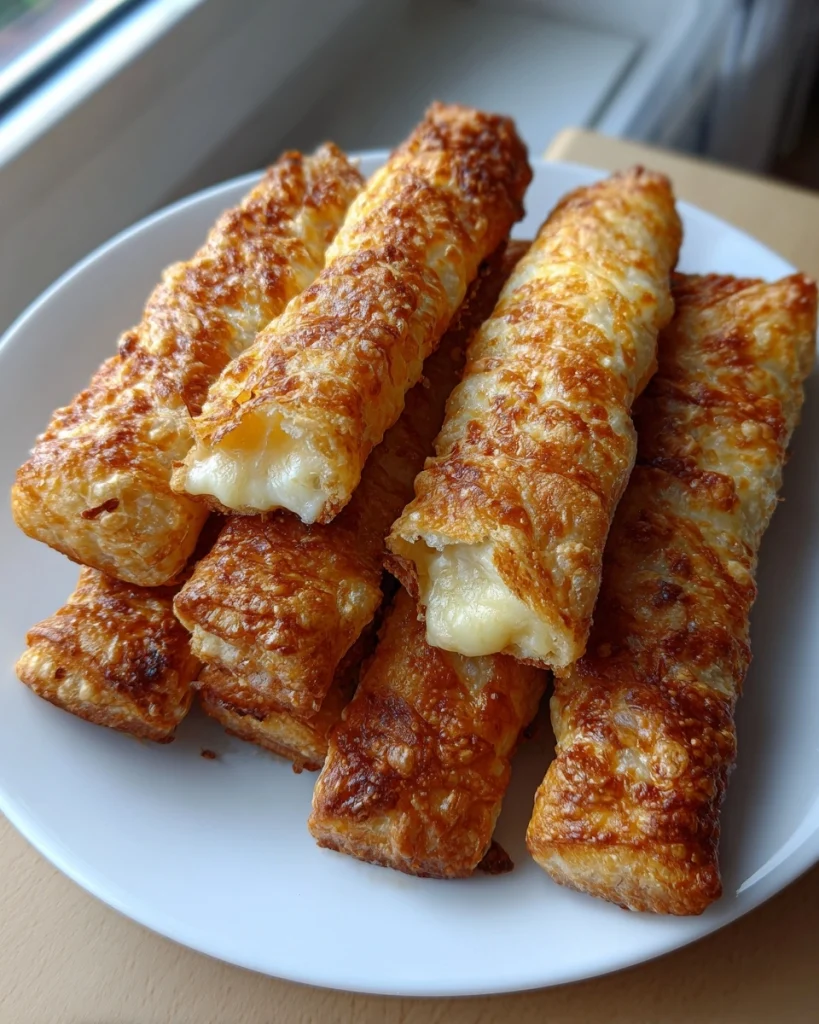
Kaasstengels
Ah, Kaasstengels! Just saying the name brings a smile to my face. These delightful Dutch cheese sticks are not just a treat; they’re a quick solution for those busy days when you need something delicious without the fuss. Picture this: a crispy exterior giving way to a cheesy, savory center. Perfect for snacking or as an appetizer, they’re sure to impress your loved ones. Whether you’re juggling work, kids, or both, this recipe is a simple way to bring a little joy to your kitchen. Let’s dive into the cheesy goodness!
Why You’ll Love This Kaasstengels
What’s not to love about Kaasstengels? They’re incredibly easy to whip up, taking just 35 minutes from start to finish. The taste? Oh, it’s a delightful blend of crispy and cheesy that will have everyone reaching for more. Plus, they’re versatile! Whether you need a quick snack for the kids or a fancy appetizer for guests, these cheese sticks fit the bill perfectly. Trust me, they’ll become a family favorite!
Ingredients for Kaasstengels
Let’s gather our ingredients for these scrumptious Kaasstengels! Each component plays a vital role in creating that perfect cheesy bite.
- Grated cheese: Aged cheese works best for a rich flavor. Think sharp cheddar or gouda for that extra oomph!
- Butter: Softened butter adds richness and helps bind everything together. It’s the secret to that melt-in-your-mouth texture.
- All-purpose flour: This is the backbone of our dough. It gives structure while keeping the sticks light and crispy.
- Egg: A beaten egg is essential for brushing on top. It gives our Kaasstengels that beautiful golden finish.
- Salt: Just a pinch enhances the flavors of the cheese and butter, making every bite irresistible.
- Paprika (optional): A dash of paprika adds a hint of warmth and color. Feel free to skip it or swap it for your favorite spice!
For exact measurements, check the bottom of the article where you can find everything listed for easy printing. Now, let’s get ready to make some magic in the kitchen!
How to Make Kaasstengels
Now that we have our ingredients ready, let’s dive into the steps to create these delightful Kaasstengels. Follow along, and I promise you’ll be rewarded with cheesy goodness in no time!
Step 1: Preheat the Oven
First things first, preheat your oven to 180°C (350°F). Preheating is crucial because it ensures even baking. You want those Kaasstengels to be crispy on the outside and perfectly cheesy on the inside. Trust me, this step is non-negotiable!
Step 2: Mix Butter and Cheese
In a mixing bowl, combine the softened butter and grated cheese. Use a fork or your hands to blend them until they’re well mixed. This combination creates a creamy base that will give your cheese sticks that irresistible texture. Don’t rush this step; it’s where the magic begins!
Step 3: Combine Dry Ingredients
Next, add the all-purpose flour and salt to the cheese mixture. The flour is essential for structure, while the salt enhances the flavors. Mix until a dough starts to form. You want it to be cohesive but not too sticky. A little elbow grease goes a long way here!
Step 4: Form the Dough
Now, it’s time to roll out the dough. On a floured surface, roll it to about 1/4 inch thick. This thickness is key for achieving that perfect crunch. If it’s too thick, your Kaasstengels won’t bake evenly. So, take your time and get it just right!
Step 5: Cut into Shapes
Using a sharp knife or pizza cutter, cut the dough into strips or your desired shapes. You can go classic with rectangles or get creative with fun shapes! Just remember, the size will affect baking time, so keep them uniform for even cooking.
Step 6: Prepare for Baking
Before baking, brush the tops of your cheese sticks with the beaten egg. This step is vital for that beautiful golden color and a lovely sheen. It’s like giving your Kaasstengels a little spa treatment before they hit the oven!
Step 7: Bake to Perfection
Finally, place your baking sheet in the preheated oven. Bake for 15-20 minutes or until they’re golden brown. Keep an eye on them, as ovens can vary. You’ll know they’re done when they smell heavenly and look irresistible!
Tips for Success
- Use aged cheese for a richer flavor; it makes a world of difference!
- Don’t skip the preheating step; it’s essential for even baking.
- Keep your dough chilled if it gets too soft; this helps maintain shape.
- Experiment with spices or herbs for a unique twist on flavor.
- Store leftovers in an airtight container to keep them crispy.
Equipment Needed
- Baking sheet: A standard one works, but a silicone mat can prevent sticking.
- Parchment paper: Great for lining the baking sheet; it makes cleanup a breeze.
- Mixing bowl: Any size will do, just ensure it’s big enough for mixing.
- Rolling pin: If you don’t have one, a wine bottle can work in a pinch!
- Knife or pizza cutter: For cutting the dough into shapes; scissors can also do the trick.
Variations
- Herb-Infused: Add dried herbs like oregano or thyme to the dough for an aromatic twist.
- Spicy Kick: Mix in some crushed red pepper flakes or cayenne for a spicy version that packs a punch.
- Cheese Medley: Combine different types of cheese, like mozzarella and parmesan, for a unique flavor profile.
- Gluten-Free: Substitute all-purpose flour with a gluten-free blend to cater to dietary needs.
- Sweet Variation: For a dessert twist, add a sprinkle of cinnamon and sugar to the dough and serve with a sweet dip.
Serving Suggestions
- Pair your Kaasstengels with a tangy dipping sauce like marinara or a creamy ranch for extra flavor.
- Serve alongside a fresh salad for a light meal that balances the richness of the cheese sticks.
- For drinks, consider a crisp white wine or sparkling water with lemon for a refreshing touch.
- Presentation matters! Arrange them on a colorful platter with fresh herbs for a pop of color.
FAQs about Kaasstengels
As you embark on your Kaasstengels journey, you might have a few questions. Don’t worry; I’ve got you covered! Here are some common queries that pop up when making these delightful cheese sticks.
Can I use different types of cheese for Kaasstengels?
Absolutely! While aged cheese is recommended for its rich flavor, feel free to experiment with your favorites. Cheddar, gouda, or even a mix can create a unique taste!
How do I store leftover Kaasstengels?
To keep them crispy, store your leftover Kaasstengels in an airtight container at room temperature. They should stay fresh for up to a week. Just reheat them in the oven for a few minutes to regain that crunch!
Can I freeze Kaasstengels?
Yes, you can! Freeze the unbaked sticks on a baking sheet, then transfer them to a freezer bag. When you’re ready to enjoy, bake them straight from the freezer, adding a few extra minutes to the baking time.
What can I serve with Kaasstengels?
These cheese sticks pair wonderfully with a variety of dips! Try marinara, ranch, or even a spicy aioli for a flavor explosion. They also make a great addition to a cheese platter!
Are Kaasstengels suitable for vegetarians?
Yes, Kaasstengels are vegetarian-friendly! With cheese, butter, and flour as the main ingredients, they’re a perfect snack for those following a vegetarian diet.
Summarizing the Joy of Kaasstengels
There’s something truly magical about Kaasstengels. They bring warmth and comfort to any gathering, whether it’s a casual family night or a festive celebration. The joy of pulling a tray of golden, cheesy sticks from the oven is unmatched. Each bite is a delightful crunch, followed by a burst of flavor that makes you smile. Plus, they’re so easy to make, even on the busiest days! Sharing these treats with loved ones creates memories that linger long after the last bite. So, roll up your sleeves and let the cheesy goodness fill your home with happiness!
PrintKaasstengels: Discover the Secret to Perfect Bites

Kaasstengels are delicious Dutch cheese sticks that are crispy on the outside and cheesy on the inside, perfect for snacking or as an appetizer.
- Prep Time: 15 minutes
- Cook Time: 20 minutes
- Total Time: 35 minutes
- Yield: 20-25 cheese sticks 1x
- Category: Snack
- Method: Baking
- Cuisine: Dutch
- Diet: Vegetarian
Ingredients
- 200g grated cheese (preferably aged cheese)
- 100g butter, softened
- 250g all-purpose flour
- 1 egg, beaten
- 1 tsp salt
- 1/2 tsp paprika (optional)
Instructions
- Preheat the oven to 180°C (350°F).
- In a bowl, mix the softened butter and grated cheese until well combined.
- Add the flour, salt, and paprika, and mix until a dough forms.
- Roll out the dough on a floured surface to about 1/4 inch thick.
- Cut the dough into strips or desired shapes.
- Place the strips on a baking sheet lined with parchment paper.
- Brush the tops with the beaten egg for a golden finish.
- Bake in the preheated oven for 15-20 minutes or until golden brown.
- Let cool slightly before serving.
Notes
- For extra flavor, you can add herbs or spices to the dough.
- These cheese sticks can be stored in an airtight container for up to a week.
- Serve with a dip of your choice for added taste.
Nutrition
- Serving Size: 1 cheese stick
- Calories: 120
- Sugar: 0g
- Sodium: 150mg
- Fat: 8g
- Saturated Fat: 5g
- Unsaturated Fat: 2g
- Trans Fat: 0g
- Carbohydrates: 10g
- Fiber: 0g
- Protein: 4g
- Cholesterol: 20mg