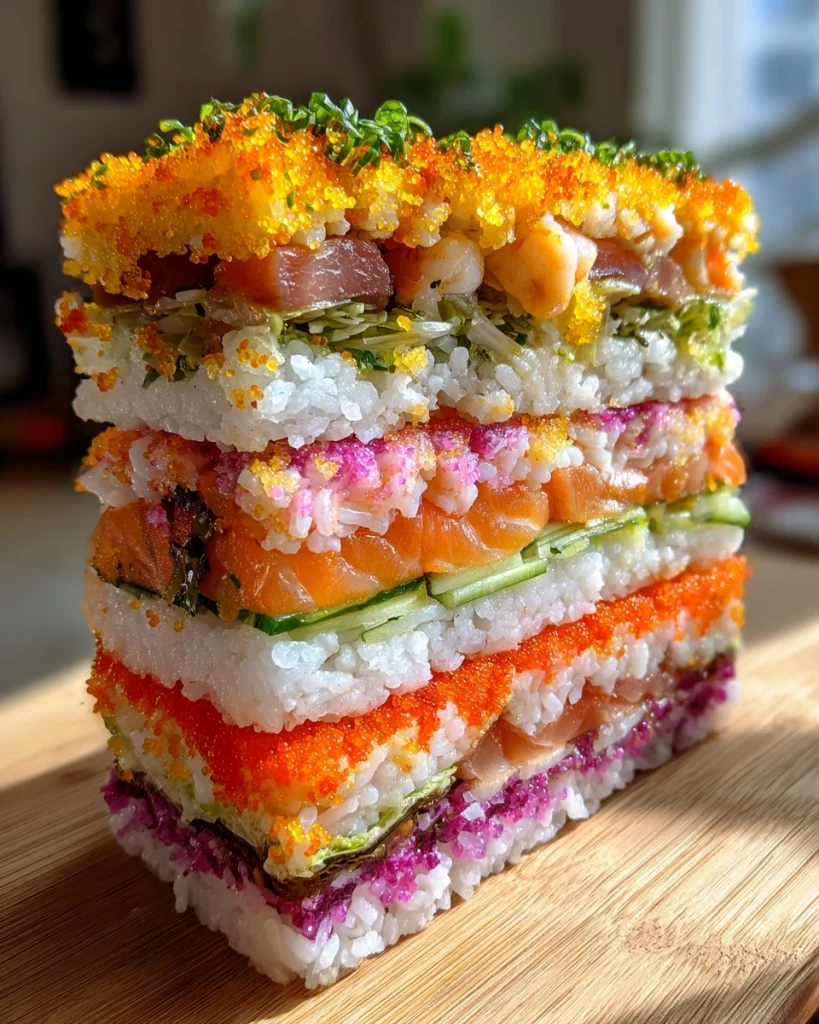
Sushi sandwich
As a busy mom, I know how challenging it can be to whip up something delicious and satisfying for the family. That’s where the sushi sandwich comes in! This delightful layered sushi is not only a feast for the eyes but also a quick solution for those hectic days. Imagine vibrant layers of fresh ingredients nestled between sheets of sushi rice, creating a portable meal that everyone will love. Whether you’re looking to impress your loved ones or simply want a fun twist on traditional sushi, this recipe is sure to become a favorite in your kitchen!
Why You’ll Love This Sushi Sandwich
This sushi sandwich is a game-changer for busy days! It’s quick to prepare, taking just an hour from start to finish. The taste? Absolutely divine! With fresh ingredients layered beautifully, each bite bursts with flavor. Plus, it’s a fun way to get the kids involved in the kitchen. They’ll love rolling their own sushi sandwiches, making mealtime a delightful family affair. Trust me, this dish will quickly become a go-to in your home!
Ingredients for Sushi Sandwich
Gathering the right ingredients is key to making a delicious sushi sandwich. Here’s what you’ll need:
- Sushi rice: This short-grain rice is sticky and perfect for holding everything together.
- Water: Essential for cooking the rice to the right texture.
- Rice vinegar: Adds a tangy flavor that balances the sweetness of the sugar.
- Sugar: Just a touch to enhance the flavor of the rice.
- Salt: A pinch to bring out the flavors in the rice.
- Nori (seaweed): These sheets wrap around the sushi sandwich, adding a delightful umami taste.
- Avocado: Creamy and rich, it adds a smooth texture and healthy fats.
- Cucumber: Fresh and crunchy, it provides a refreshing contrast to the other ingredients.
- Carrot: Julienned for a bit of sweetness and color, making the sandwich visually appealing.
- Cooked shrimp or crab meat: These proteins add a savory depth, but feel free to substitute with tofu for a vegetarian option.
- Soy sauce: A must-have for dipping, it enhances the flavors of the sushi sandwich.
For those who want to get creative, you can customize the fillings based on your preferences. Think about adding bell peppers, radishes, or even pickled vegetables for an extra zing! The exact quantities of these ingredients are listed at the bottom of the article for your convenience.
How to Make Sushi Sandwich
Now that you have all your ingredients ready, let’s dive into making this delightful sushi sandwich! Follow these simple steps, and you’ll have a beautiful layered sushi ready to impress your family.
Step 1: Rinse the Sushi Rice
Start by rinsing the sushi rice under cold water. This step is crucial! It removes excess starch, ensuring your rice is sticky but not gummy. Keep rinsing until the water runs clear. It’s like giving your rice a refreshing shower!
Step 2: Cook the Rice
Next, combine the rinsed rice and water in a rice cooker. Cook according to the manufacturer’s instructions. If you don’t have a rice cooker, a pot on the stove works just fine. Just bring it to a boil, then cover and simmer until the water is absorbed. The aroma of cooking rice is simply heavenly!
Step 3: Prepare the Vinegar Mixture
While the rice is cooking, mix the rice vinegar, sugar, and salt in a small bowl. Stir until everything is dissolved. This mixture adds a lovely tang to your sushi rice, making it taste authentic. Once the rice is done, transfer it to a large bowl and gently fold in the vinegar mixture. Be careful not to mash the rice; you want to keep those lovely grains intact!
Step 4: Assemble the Sushi Sandwich
Lay a sheet of nori on a bamboo sushi mat or a clean surface. Spread a thin layer of sushi rice over the nori, leaving a small border at the top. This is where the magic happens! Layer your avocado, cucumber, carrot, and shrimp or crab meat on top of the rice. Feel free to get creative with your layers!
Step 5: Roll It Up
Now comes the fun part! Carefully roll the sushi from the bottom up, using the mat to help keep it tight. Don’t rush this step; a gentle touch will yield a beautiful roll. Once you reach the top, wet the border of the nori to seal it. It’s like wrapping a present, but way tastier!
Step 6: Slice and Serve
Finally, slice each sushi sandwich into bite-sized pieces. A sharp knife works best here, and a quick dip in water between cuts helps prevent sticking. Serve with soy sauce for dipping, and watch your family’s eyes light up with delight. Enjoy your homemade sushi sandwich!
Tips for Success
- Use a sharp knife to slice your sushi sandwiches for clean cuts.
- Wet your hands when handling sushi rice to prevent sticking.
- Experiment with fillings to keep things exciting for your family.
- Don’t overfill your sushi sandwich; less is often more!
- Serve immediately for the best texture, but they can be refrigerated for up to 2 hours.
Equipment Needed
- Bamboo sushi mat: This helps in rolling the sushi tightly. If you don’t have one, a clean kitchen towel works too.
- Sharp knife: Essential for slicing your sushi sandwiches cleanly. A serrated knife can also do the trick.
- Rice cooker or pot: For cooking the sushi rice perfectly. A pot on the stove is a great alternative.
- Mixing bowl: To combine your rice and vinegar mixture.
Variations
- Vegetarian Delight: Swap out the shrimp or crab meat for marinated tofu or extra veggies like bell peppers and radishes for a colorful twist.
- Spicy Kick: Add a drizzle of sriracha or spicy mayo to your layers for a zesty flavor that will wake up your taste buds!
- Fruit Fusion: Try adding thin slices of mango or strawberries for a sweet and savory combination that’s perfect for summer.
- Whole Grain Option: Use brown sushi rice instead of white for a nuttier flavor and added fiber.
- Gluten-Free Wrap: If you’re avoiding gluten, ensure your soy sauce is gluten-free, or try tamari as a delicious alternative.
Serving Suggestions
- Fresh Salad: Pair your sushi sandwich with a light cucumber or seaweed salad for a refreshing crunch.
- Fruit Platter: Serve with a colorful fruit platter to add a sweet touch to your meal.
- Green Tea: Enjoy with a warm cup of green tea for a soothing beverage that complements the flavors.
- Presentation: Arrange the sushi sandwiches on a beautiful platter, garnished with sesame seeds or pickled ginger for an elegant touch.
FAQs about Sushi Sandwich
Can I make sushi sandwiches ahead of time?
Absolutely! You can prepare the sushi sandwiches a few hours in advance. Just keep them in the refrigerator, wrapped in plastic wrap to maintain freshness. However, for the best texture, I recommend serving them immediately after making.
What can I use instead of nori?
If you’re not a fan of nori, you can use rice paper or even large lettuce leaves as a wrap. This gives a fresh twist to your sushi sandwich while keeping it gluten-free!
Can I use brown rice for sushi sandwiches?
Yes, brown rice is a great alternative! It adds a nuttier flavor and more fiber. Just keep in mind that it may require a bit more cooking time to achieve the right texture.
What are some good dipping sauces for sushi sandwiches?
Soy sauce is a classic choice, but you can also try spicy mayo, ponzu sauce, or even a sweet chili sauce for a fun twist. Each adds a unique flavor to your sushi sandwich experience!
How do I store leftover sushi sandwiches?
Store any leftovers in an airtight container in the refrigerator. They’re best enjoyed within a day, but you can keep them for up to two days. Just remember, the texture may change slightly!
Summarizing the Joy of Sushi Sandwich
Creating a sushi sandwich is more than just making a meal; it’s about bringing joy to your kitchen and your family. Each layer tells a story, from the creamy avocado to the crunchy cucumber, making every bite a delightful experience. This layered sushi is not only visually stunning but also a fun way to engage your loved ones in the cooking process. Whether it’s a quick lunch or a special dinner, the sushi sandwich brings smiles and satisfaction. So roll up your sleeves, gather your ingredients, and let the sushi sandwich become a cherished part of your culinary adventures!
PrintSushi sandwich: Discover the ultimate layered sushi delight!

A delicious and innovative take on traditional sushi, the sushi sandwich features layers of fresh ingredients between sheets of sushi rice, creating a delightful and portable meal.
- Prep Time: 30 minutes
- Cook Time: 30 minutes
- Total Time: 1 hour
- Yield: 4 servings 1x
- Category: Main Course
- Method: Rolling
- Cuisine: Japanese
- Diet: Gluten Free
Ingredients
- 2 cups sushi rice
- 2 1/2 cups water
- 1/4 cup rice vinegar
- 2 tablespoons sugar
- 1 teaspoon salt
- 4 sheets nori (seaweed)
- 1 avocado, sliced
- 1 cucumber, julienned
- 1 carrot, julienned
- 1/2 pound cooked shrimp or crab meat
- Soy sauce, for serving
Instructions
- Rinse the sushi rice under cold water until the water runs clear.
- Combine the rinsed rice and water in a rice cooker and cook according to the manufacturer’s instructions.
- In a small bowl, mix rice vinegar, sugar, and salt until dissolved. Once the rice is cooked, transfer it to a large bowl and gently fold in the vinegar mixture.
- Lay a sheet of nori on a bamboo sushi mat or a clean surface.
- Spread a thin layer of sushi rice over the nori, leaving a small border at the top.
- Layer the avocado, cucumber, carrot, and shrimp or crab meat on top of the rice.
- Carefully roll the sushi from the bottom up, using the mat to help keep it tight.
- Repeat the process with the remaining ingredients to create additional sushi sandwiches.
- Slice each sushi sandwich into bite-sized pieces and serve with soy sauce.
Notes
- Feel free to customize the fillings based on your preferences.
- For a vegetarian option, substitute the seafood with tofu or additional vegetables.
- Serve immediately for the best texture, or refrigerate for up to 2 hours before serving.
Nutrition
- Serving Size: 1 sandwich
- Calories: 350
- Sugar: 2g
- Sodium: 500mg
- Fat: 10g
- Saturated Fat: 1g
- Unsaturated Fat: 8g
- Trans Fat: 0g
- Carbohydrates: 50g
- Fiber: 4g
- Protein: 15g
- Cholesterol: 50mg